A detailed guide of Magento 2 design is the one that any designer needs when initially coming to Magento. Understanding this demand, we decided to give an article on this concept.
We have also previously delivered a Magento 2 design tutorial. However, we want to go in-depth to help you create the best theme for your store.
In this article, we will give you information on Magento 2 design guide, particularly:
- An overview of Magento themes.
- How to create a perfect theme?
- How to apply themes?
- How to uninstall themes?
So, what are you waiting for? Let’s get started!
Table of Contents
Overview of Magento Theme

As you may know, a theme is a design, a template for your Magento store. A good theme will result in a good impression from customers, right?
However, there is more information about Magento theme you may not know. And we’re here to help you.
#1 Components of Magento Theme

A theme is a combination of several components. Some fundamental elements are:
- Layout: represents the structure of a website using XML, which determines all the containers and blocks constructing the web page. Additionally, the layout is stored in app/design/frontend/your_interface/your_theme/layout/.
- Templates: are initiated in layouts files, and each layout block has a related template. Templates are located in app/design/frontend/your_interface/your_theme/template/.
- Locale: identifies the language, country, and many other settings in your online store. And you can set the time zone, the area, the day of your store with locale options. Locale is located in app/design/frontend/your_interface/your_theme/locale/.
- Skins: These are block-specific Javascript and CSS and image files that compliment your (X)HTML.
A theme may contain all or some of those components.
#2 Magento Default Theme
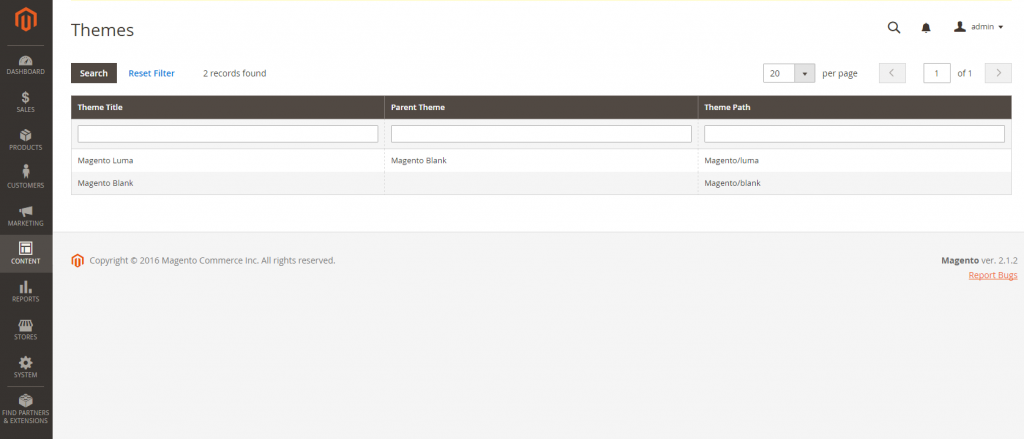
Magento default theme is the central theme of the website. When you first use Magento without doing anything else, the default theme will automatically be applied and loaded to the front-end.
But, of course, you would want your design to be perfect and attractive enough that you have to customize your default design. In this case, you have to use Magento non-default theme.
#3 Magento Non-default Theme

In contrast to the default theme, Magento custom design theme is something you need to install from the third-party. This kind of non-default theme enables you to customize your design to be the most beautiful in customers’ eyes.
Magento custom design theme can contain many or a few small themes to meet your demand. You can use this as a temporary theme, for example, make your store more special on specific occasions.
Also, we have already had a review of the best Magento themes for e-commerce sites! Check it out now!
#4 The Process of Designing Magento Website
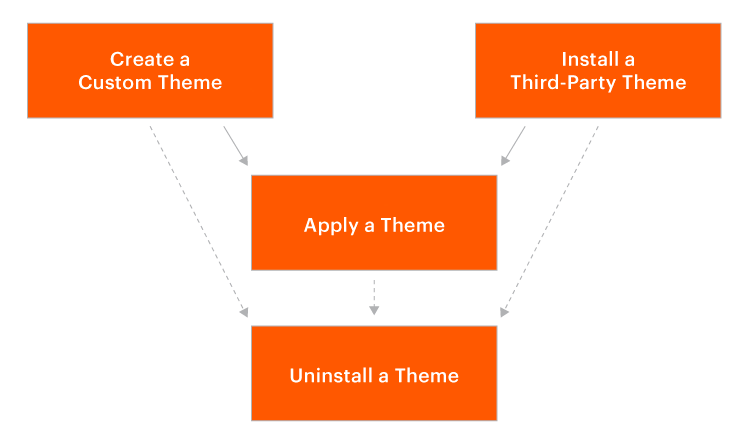
Usually, there is a flow to design an online store in general and a Magento store in particular. The process starts from creating or installing a theme, applying a theme, and finally, uninstalling it if needed.
You can see it more clearly in the image above.
And in the following Magento design tutorial, we will clarify all 3 steps to help you complete the design progress successfully.
Magento Design Tutorial: How to Create A Perfect Theme
In this part, we will show you or any Magento 2 designers how to do the very first step: creating a new storefront theme.
Getting started
Before anything else, you need to create a new custom theme and set your Magento application to the developer mode.
#1 Create A Theme Directory
- Go to <magento_root>/app/design/frontend
- Create a new directory named based on your vendor’s name: /app/design/frontend/<Vendor>
- Under the just-created folder, create a directory named based on your theme
app/design/frontend/
 ├── <Vendor>/
 │   │   ├──...<theme>/
 │   │   │   ├── ...
 │   │   │   ├── ...
#2 Declare your theme
- In your theme directory: app/design/frontend/<Vendor>/<theme>, please add an existing theme.xml file
- To configure the theme, please run this code line:
<theme xmlns:xsi="http://www.w3.org/2001/XMLSchema-instance" xsi:noNamespaceSchemaLocation="urn:magento:framework:Config/etc/theme.xsd">
   <title>New theme</title> <!-- your theme's name -->
   <parent>Magento/blank</parent> <!-- the parent theme, in case your theme inherits from an existing theme -->
   <media>
      <preview_image>media/preview.jpg</preview_image> <!-- the path to your theme's preview image -->
   </media>
</theme>
If you don’t have the preview images, you can remove the <media> mode in the code.
#3 Make A Composer Package for Your Theme
To make a composer package, you can add a composer.json file to the theme directory.
This code below is an example:
{
    "name": "magento/theme-frontend-luma",
    "description": "N/A",
    "config": {
        "sort-packages": true
    },
    "require": {
        "php": "~7.1.3||~7.2.0",
        "magento/framework": "*",
        "magento/theme-frontend-blank": "*"
    },
    "type": "magento2-theme",
    "license": [
        "OSL-3.0",
        "AFL-3.0"
    ],
    "autoload": {
        "files": [
            "registration.php"
        ]
    }
}
#4 Add Registration.php
In this step, you can add registration.php to your theme directory using:
\Magento\Framework\Component\ComponentRegistrar;
ComponentRegistrar::register(ComponentRegistrar::THEME, 'frontend/<Vendor>/<theme>', __DIR__);
#5 Configure Images
Several characteristics, for example, sizes, qualities, etc. are the things you need to configure to fit your design.
- Log in to your server and create another directory
- Add the view.xml file from that directory of the parent theme
- Configure images by this command:
...
  <image id="category_page_grid" type="small_image">
      <width>250</width>
      <height>250</height>
  </image>
...
#6 Create Directories for Static files
There are several types of static files in your theme, namely, styles, fonts, JavaScript, images. Such files are located in separate sub-directory in your theme folder.
Therefore, you need to do 2 following steps:
- Clear the pub/static directory:
rm -rf <magento_root>/pub/static/*
- Clear the var/view_preprocessed directory:
rm -rf <magento_root>/var/view_preprocessed/*
And then, your directory will look like this:
app/design/frontend/<Vendor>/
├── <theme>/
│   ├── etc/
│   │   ├── view.xml
│   ├── web/
│   │   ├── images
│   │   │   ├── logo.svg
│   ├── registration.php
│   ├── theme.xml
│   ├── composer.json
#7 Add & Declare Theme Logo
In Magento, the logo file is named logo.svg in the default. When you add the logo file in the conventional directory, it will be automatically identified as the theme logo.
And now, to declare it, execute the command as follows:
<page xmlns:xsi="http://www.w3.org/2001/XMLSchema-instance" xsi:noNamespaceSchemaLocation="urn:magento:framework:View/Layout/etc/page_configuration.xsd">
    <body>
        <referenceBlock name="logo">
            <arguments>
                <argument name="logo_src" xsi:type="string">images/my_logo.png</argument>
                <argument name="logo_width" xsi:type="number">300</argument>
                <argument name="logo_height" xsi:type="number">300</argument>
                <argument name="logo_alt" xsi:type="string">Logo name</argument>
            </arguments>
        </referenceBlock>
    </body>
</page>
Magento 2 Design Guide: How to Apply Themes to Your Sites?

Now, you have done creating the theme. You need to apply it to your website.
Please follow these 3 simple steps for this purpose:
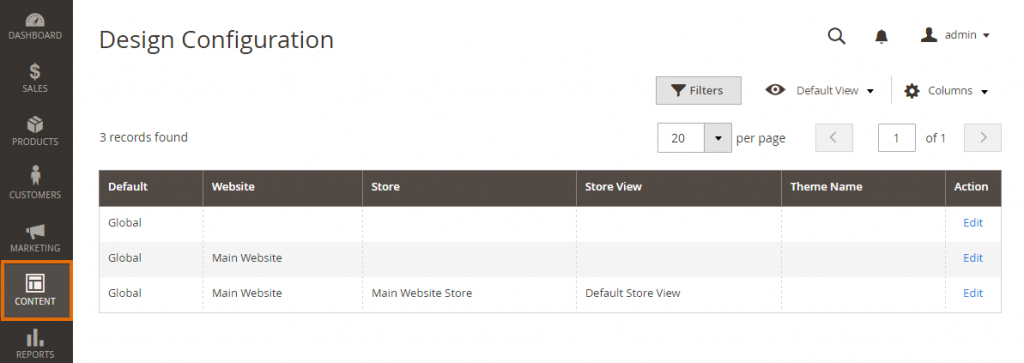
- Go to CONTENT > Design > Configuration, and the design configuration page will be displayed.

- In the default store view line, click Edit. Then, it will appear as the image.
- Please select the newly created theme in the dropdown of Applied Theme. And finally, please click Save Configuration to save changes.
Magento Designer Guide: Uninstalling Themes
Of course, this step is optional, as it depends on your need. If you don’t want to, just skip this.
For Magento 2 designers, there are 3 ways to uninstall themes depending on 3 different cases when installing it.
Getting started
To uninstall the theme, you need to make sure:
- The Magento application is set at developer mode.
- The theme is not applied to the storefront or any store view.
- The theme is not a parent or any registered theme.
#1 Uninstall A Manually Added Theme
- Go to the vendor directory and remove it.
- Remove the theme record. If you are using MySQL, please run this code line:
mysql -u <user> -p -e "delete from <dbname>.theme where theme_path ='<Vendor>/<theme>' AND area ='frontend' limit 1"
#2 Uninstall A Theme Package
- If Magento was installed via Composer, you could use a specific CLI command to uninstall the theme.
- If Magento was installed by cloning the repository, you could also use the CLI command. But you have to remove it from the dependencies by this command:
"require": {
 ...
    "<vendor>/<theme-name>": "<version>"
},
#3 Uninstall Pre-made Themes
This case is simple to uninstall by using the Component Manager:
- In the Admin panel, please go to System > Web Setup Wizard > Extension Manager
- In the Actions column, click Select > Uninstall
Wrapping Up
In conclusion, designing a website is never an easy process, even with the most skilled designers. That’s why we provide a detailed guide for Magento designers.
We hope that this article, with a clear Magento design guide, will help you have a deeper understanding of designing.
If you need more information about Magento designer guide or Magento 2 design guide, please feel free to comment in the section below. We’re glad to answer any questions.


